Retained Austenite Measurement
This type of measurement strongly influences the properties of steel; the fatigue life, ductility, toughness, hardness, yield strength & machinability depend on austenite content.
Accurate measurement of the volume percent retained austenite is of critical importance to the optimization of heat treatment procedures. Austenite, being an unstable phase at room temperature, will transform to martensite during use, causing brittleness and an increase in volume potentially leading to failure of critical components.
How Does It Work?
Lambda uses X-ray diffraction (XRD) testing, considered the most accurate method of determining the amount of retained austenite in steels. X-ray diffraction patterns depend upon both the crystal structures and amounts of the phases present in the sample. If the crystals are randomly oriented, the intensity of the diffraction peaks produced by each phase is proportional to the amount of the phase present.
The amount of retained austenite is calculated using the direct comparison method and the ratio of two austenite and two martensite diffraction peak intensities. The integrated intensities of the austenite and martensite diffraction peaks are measured on our custom-designed diffractometers, providing four austenite/martensite peak intensity ratios. The use of multiple diffraction peaks minimizes the effects of preferred orientation and allows interference from carbides to be detected.
A device which simultaneously rotates and oscillates small samples in the X-ray beam can be used to acquire the diffracted intensity over many orientations, allowing reliable measurement on highly textured or coarse-grained samples.
Features:
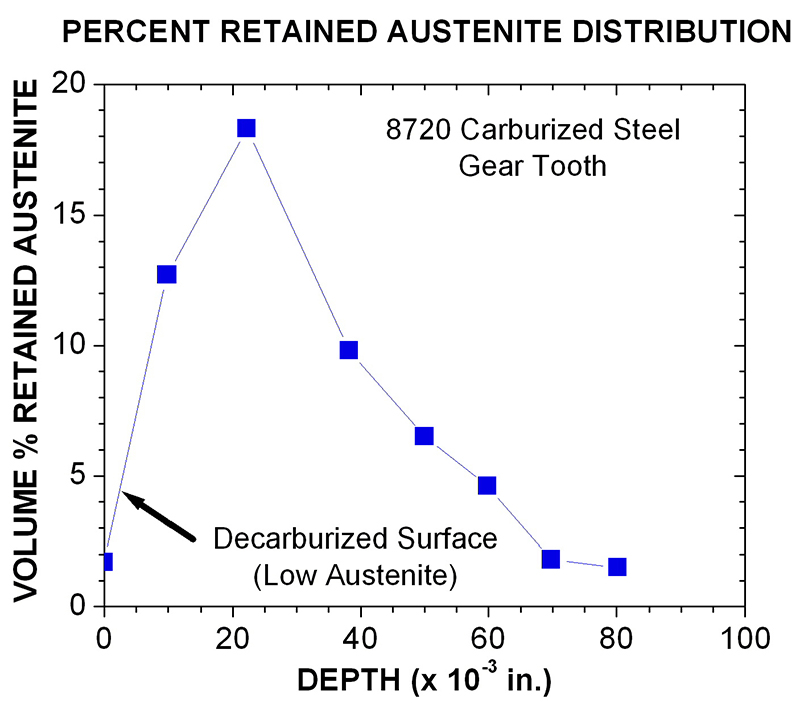
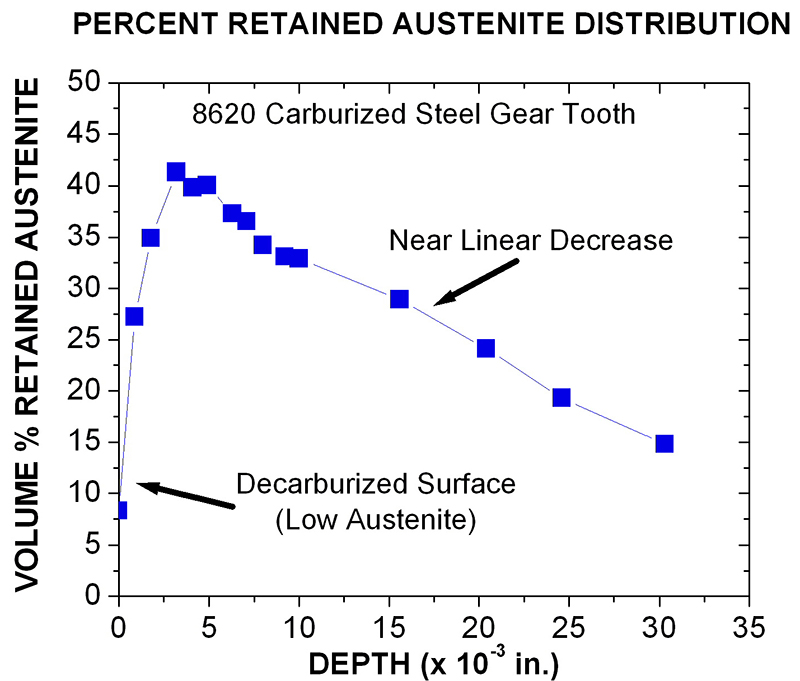
- The volume percent austenite can be determined in layers as thin as 10 microns
- Measurements can be made nondestructively on the surface of a component
- A specially designed sample holding apparatus is available to spin and rock the sample to mitigate texture and grain size effects
- Subsurface austenite distributions may be obtained through the hardened case using electropolishing
- Correction for carbide content is available
- Arbitrary sizes and shapes can be measured


How are Lambda’s services superior?
- Lambda is the only accredited independent laboratory that uses Bragg-Brentano diffractometers for measurement of retained austenite, in strict accordance with SAE SP-453 and ASTM E975.
- Austenite measurement method of Averbach and Cohen in accordance with ASTM E975.
- R-values are calculated from first principals for each steel alloy tested per SAE SP-453.
- Carbides present are routinely identified, and specific data collection schemes are developed foreach alloy to avoid and correct for carbide interference.
- Carbide content may be obtained by chemical extraction and gravimetric analysis. Correction for carbide content is available.
- We can make and certify retained austenite standards. Standards can be made of the same alloy as the test article to provide the most accurate test results.
Most measurement systems on the market today use position-sensitive detectors (PSD) that cannot be calibrated by direct calculation of the relative phase intensities and must use reference standards that typically are not of the same structure of the test article. Any difference in unit cell dimension between the calibrating austenite standard and the test article will result in a significant error in calibration of the measurement system. It is therefore critical that the reference standards are of the same alloy and structure as the samples being tested on PSD based systems.
Questions about retained austenite measurement needs?
For additional information, view our published research in Advanced Materials & Processes magazine:
Optimizing carburization in 8620H Steel Components, May/June 2019

